Tuesday, May 13, 2014

Consultants - This is a free project.  Feel free to share it with your customers and/or direct them here to my blog, but please do not charge them, other than printing charges for the tutorial.  Thank you.
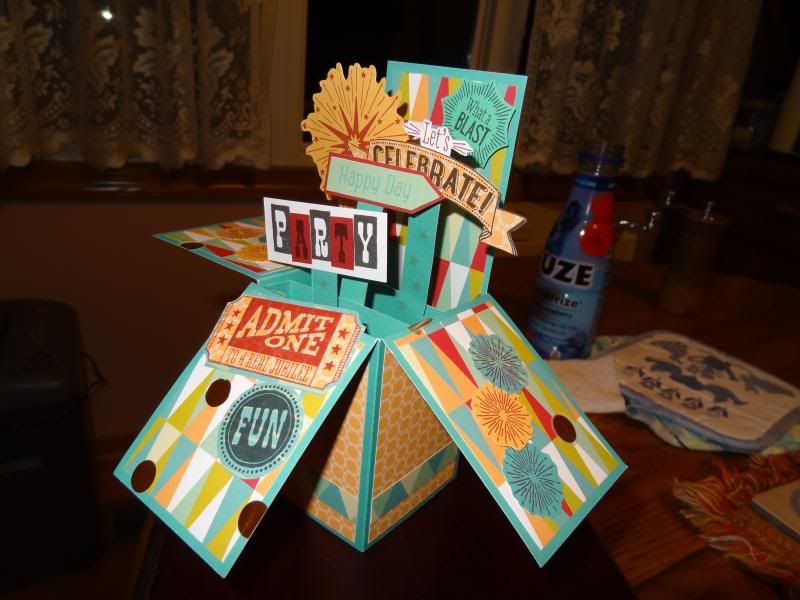
Free to be Me Box Card Project
Created by Janice Schmidt, CTMH Consultant

Paper - leftovers from the "Free to be Me" paper pack.  Cut all the pieces to do Corporate's Workshop, including layouts and cards, first.  Save ALL the scraps, even the little ones!! 
From the triangle/orange dots B&T you will need :

                ** CUT  FIRST**  (a) ONE 6 3/4h X 2 1/4w inches with the triangles going up and down                         [Piece A] and THREE  3h x 2.25w inches  with triangles  going up and down.  The tall piece can                 be shorter but should be 4 inches minimum, the taller, the better.

                (b) ONE 6 3/4 x 2 1/4 inches (this can be pieced if you can't cut it quite that tall, 4 inches                 minimum, then additional piece to make total 6 3/4 inches) [Piece B] and THREE 3 1/4 x 2 1/4                    inches. The  orange circle side will be used for these pieces so orientation doesn't matter.

                (c) any remaining scraps of this B&T

Scraps from the blue twiggy B&T, Orientation doesn't matter,  one must be at least 2 1/2 x 1 1/4,
WHITE DAISY cardstock, 1 x 2 1/4, and scrap 3 1/2 x 2
LAGOON cardstock, 10 1/2 x 7 3/4 inches, and 2 x 4 inches, and one or two scraps 1 1/2 inch square
RUBY cardstock, 5/8 x 2 1/4 inches and scrap 1 x 2 inches
CREME BRULEE cardstock 3 x 2 1/4 inches, and scrap 4 inch square
"Happy Day" from the Zip Strip
FOUR  2 1/4 inch pieces from the Blue/green triangle Zip Strip
Gold dot vellum,  ALL scraps

Stamp sets - June SOTM  S1406 Kaboom and  Artiste Collection Birthday  D1529
Black, Creme Brulee, and Ruby ink pads
Trimmer
Embossing stylus  (or whatever you use to score)
Bone Folder
Scissors
Foam tape
Adhesive for 3D item


1.Using Creme Brulee ink,  random stamp small star over LAGOON 2x4 piece.  Cut into FOUR  1/2 x 4       inch strips.


2. Using RUBY ink, stamp
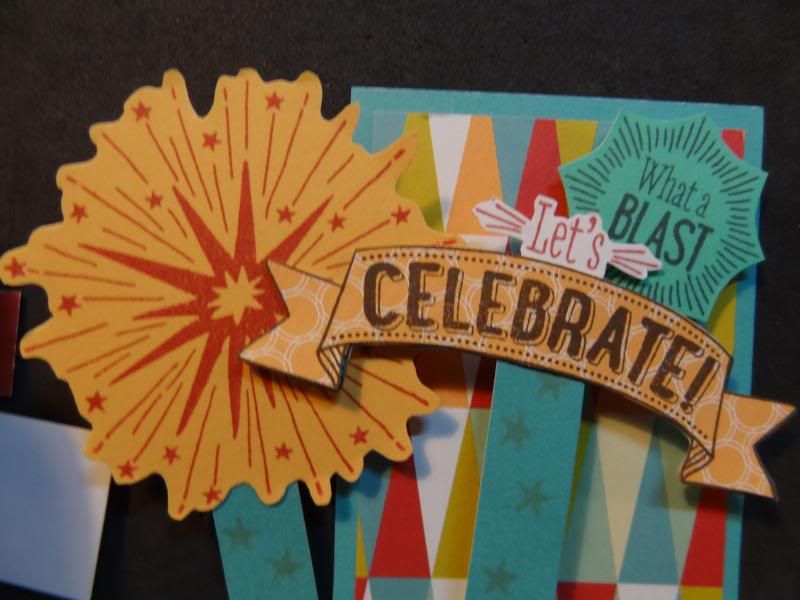
                a) large starburst and TWO small starbursts on  4 x 4 CREME BRULEE scrap, cut out
                b) 'Let's Celebrate' banner on WHITE DAISY  3 1/2 x 2 scrap, cut out
                c) 'Admit One' ticket on scrap orange circle B&T, cut out.   Adhere to twiggy B&T and cut,                              leaving small margin.
                d) ONE small starburst on scrap orange circle B&T
                e) 'What a Blast' on scrap DREAM POP green cardstock, plain side.  (Alternate,                                   JUNIPER cardstock or scrap twiggy B&T)
                f) 'Birthday Wishes'  banner on matching WHITE DAISY Cricut Artiste shape (pg 76, 2 inches)
                g)TWO small starburst on twiggy B&T


3. Using BLACK ink, stamp
                a) 'Let's Celebrate' banner on scrap orange circle B&T, cut out banner only and adhere to                             WHITE  DAISY stamped piece.
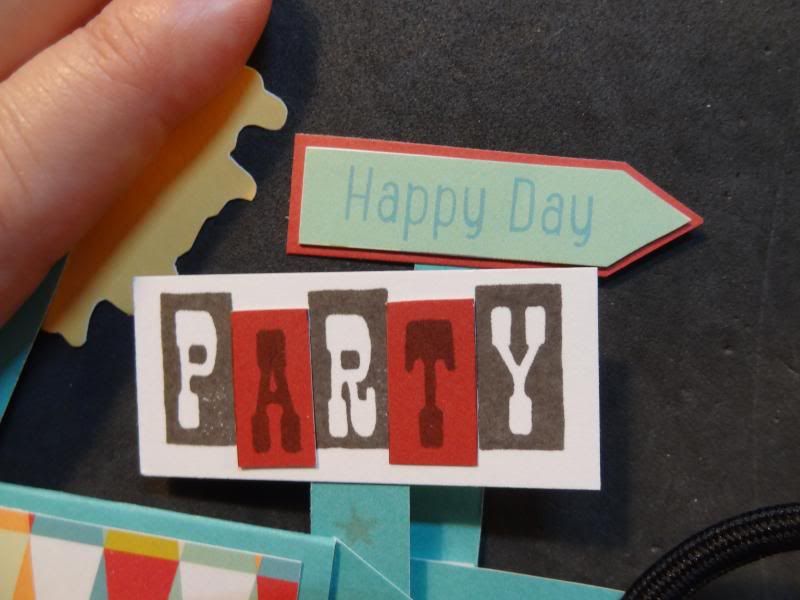
                b) ' PARTY', once on WHITE DAISY  1 x 2 1/4, and once on RUBY scrap, cut out the A and                   the T  from  RUBY cardstock and layer, slightly lower than original 'A' and 'T' for a staggered                       look.  (See  photo, 2nd below.)
                c) 'FUN' on twiggy B&T scrap


  4. Trim "Happy Day" from zip strip into a pointed strip and adhere onto RUBY cardstock.  Trim RUBY         cardstock to match.

.
5. Cut as many gold dots from vellum as desired, including any partial dots.

6. Score LAGOON cardstock at 2.5, 5, 7.5 and 10 inches.  Turn and score at 3.75 inches.   Trim 3/4 inch from the top of one long side, leaving 3.75 below the score line (the bottom of the card) and 3.25 above the score line (the top of the card).  Cut TWO pieces from this 3/4 inch strip which include a flat 2.5 inch section with two 1/2 inch or so 'wings.'
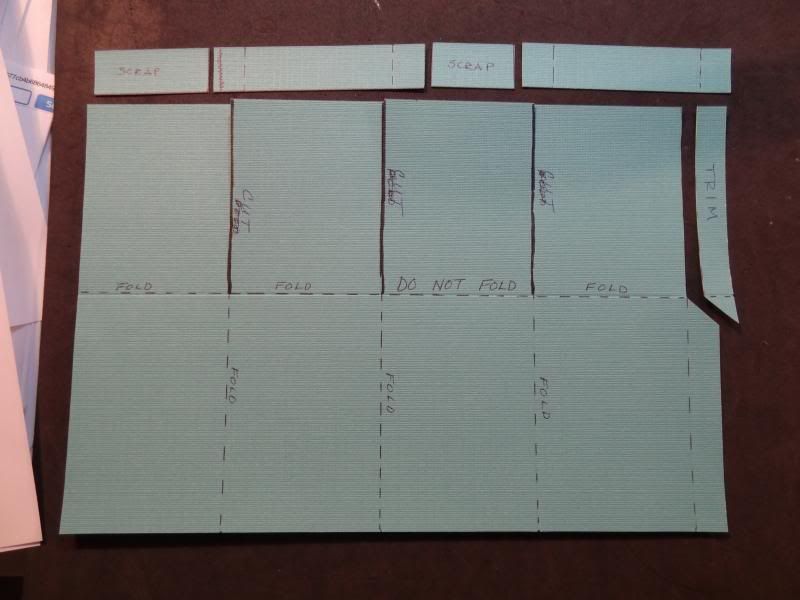


7. Cut along score lines on the 3.25 section.  Trim as shown above to create a tab for joining the box together.

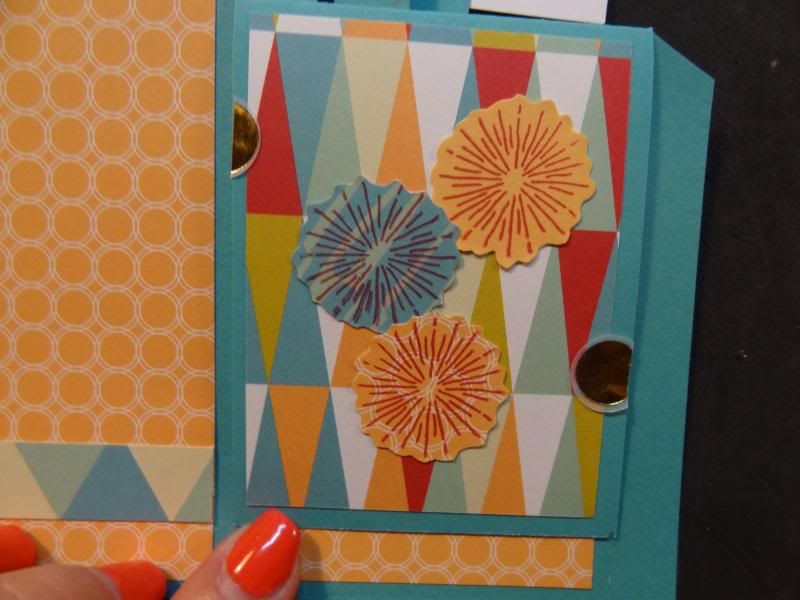
8.  Adhere the B&T,  Creme Brulee, and zip strip pieces  as shown, covering any seams in the longer B&T [Piece B]
                                        Piece A goes on the inside on the same section as piece b.
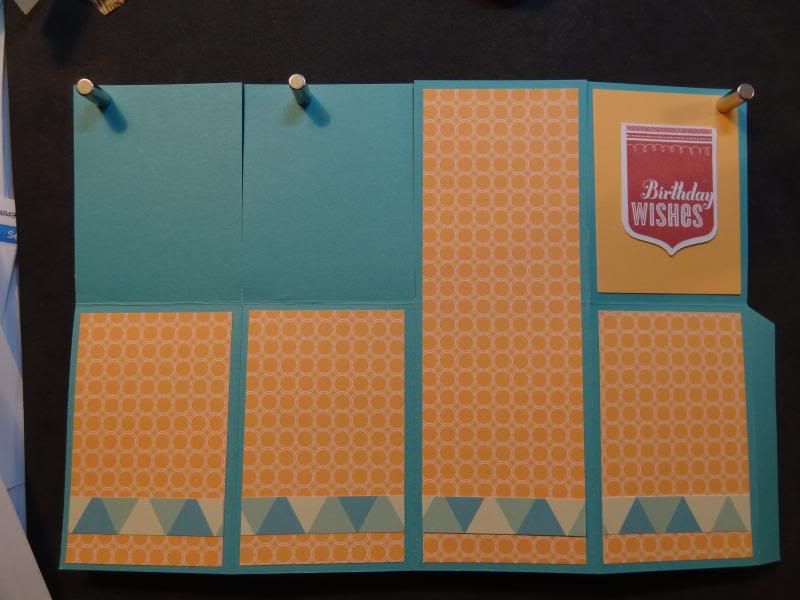

9.  Decorate the flaps as desired.


 10.  Join the card into a box.  Adhere the wings of the narrow scored support strips to the inside.


11. Adhere decorations to stamped strips and adhere as desired to support strips, using foam tape to add additional dimension.  Remember to keep decorations INSIDE THE FOLDED CARD AREA!  You can see Piece A  in this last photo.
.


Monday, May 12, 2014

More card for my ladies

Close to my Heart has 5 new embossing folders that I LOVE playing with. I used two different ones on the cards for my assisted living group - the chevron Z1925 and quatrafoil Z1926, each $8.95.  They all emboss a 5x7 area and have a slit on the folded edge so you can emboss up to a 4 x 12 inch long strip.  FUN!  The top card utilizes the Cricut to cut out the three flowers .


This card is so unique.  The sentiment tag is stamped with four different phrases (Get Well, Happy Birthday, Congratulations, and Just Because) and my ladies got to pick whichever fit their need.  This card was based on a card posted on Pinterest (whatever would I do without all that inspiration?) by LeAnne Pugliese. 


Wednesday, January 22, 2014

Latest Card Class for My Assisted Living Ladies

A new year has started for my ladies.  No more Christmas cards (for a while anyway.)  More bright colors, flowers, hearts and bows, in hopes of an early spring!  I used the CTMH Artiste Cricut cartridge for my favorite bow, and the cotton candy dots Washi tape (retired) for two of the cards and the patterns were inspired for the most part from Pinterest and blog postings, in other words, I CASE'd them.  There are so many very talented card creators out there!


Wednesday, December 4, 2013

Classy Doily ornament


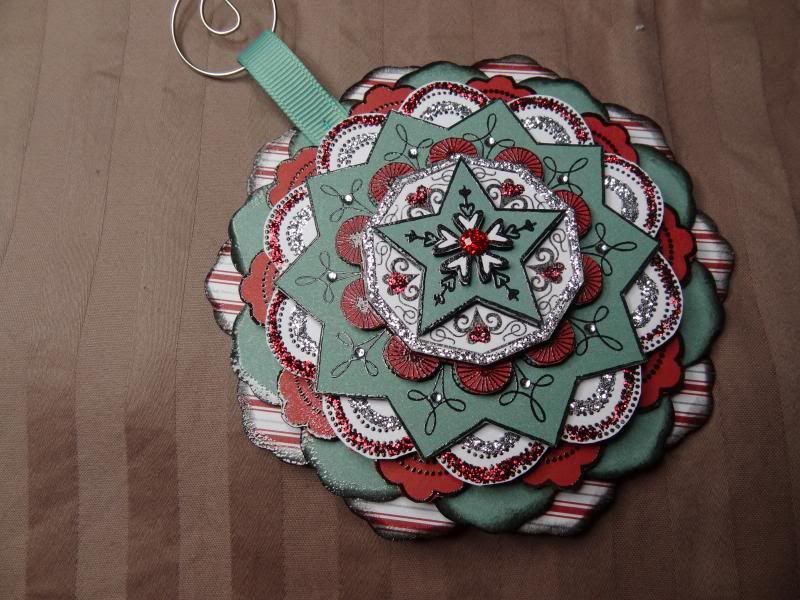
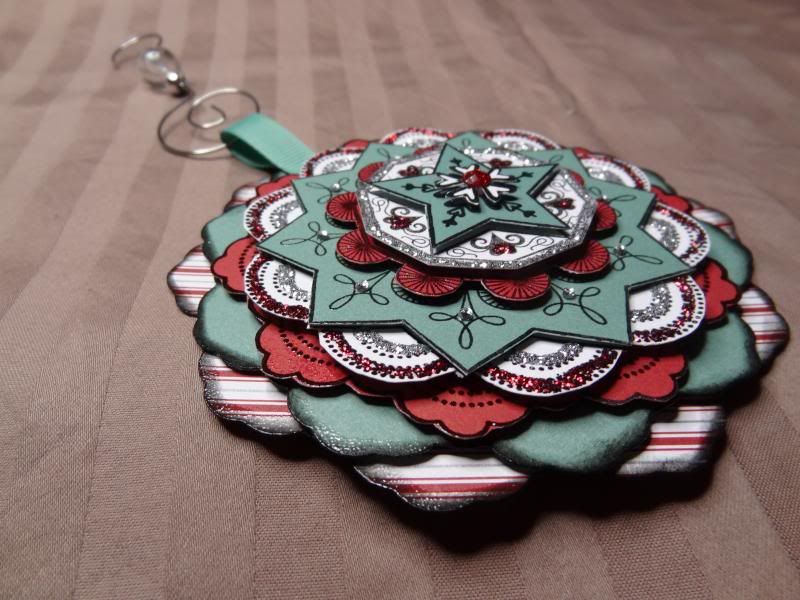
I really like how you can take a single image and cut each layer out to make a 3D shape.  I have in the way past purchased wood and rubber stamps with that in mind but have never actually made any until now.  This is such a sparkly and shiny ornament, thanks to clear embossing powder, sparkles and Glitz Glitter gel in red and silver.  Unfortunately both the embossing powder and Glitter Gel are retiring from the CTMH line January 31st.  The clear embossing powder is already sold out.  I am seriously hoping it will return in different packaging in the new Idea Book.

Supplies:
B1424 Classy Doily stamp set
X7176B Sparkle & Shine Paper Packet
Black Pigment Ink (included in the Basic mini pigment pad set Z2503)
Juniper and Ruby cardstock
Z1484 Red Glitz Glitter gel
Z1482 Silver Glitz Glitter gel
Z1263 Bitty Sparkles
a misc. red sparkle and lots of 3-D foam tape

The two largest layers are from a coordinating cut on the Artiste Cricut cartridge, Z1790, the rest of the layers were cut using our Micro-Tip Scissors, which sadly are also retiring (but the Non-Stick version will continue.)

Tuesday, October 15, 2013

Huntington mini cards

I chose to do mini cards in a swap using the lovely Huntington paper pack.  For some reason, I was feeling especially creative and my ideas turned very nicely into some really cute projects.

It is a little difficult to see but I used the hexagonal stitch pattern from our new Stitch Guide Z1852 to make a double row of holes around a Cricut-cut hexagon on this first 3x3 card.  Another consultant had said that this size card works well as a little lunchbox 'love' so I kept this in mind for this project.

This next one uses what is called a Joy-Luck pattern but in a miniature size.  The Sparkle in the corner keeps the first flap from opening until you want to see the rest of the card.


I wanted to try the Stair Step style card for my 3rd mini and was pleased to have this adorable little card evolve.  It uses Cricut cuts from the Artiste and Art Philosophy cartridge.  I think it would make a beautiful place card for any Thanksgiving dinner.


My next swap is with the Sparkle & Shine papers.  I hope the Creative juices are still flowing freely as I work on those.

Sunday, October 13, 2013

After the Crop

By the time this posts, the crop which I am attending as a vendor will be done.  One of the centerpieces for my display will be this wonderful Advent Calendar.  If is made using our Designed Decor Black Frame which has five wires strung across the opening of a lovely black wooden frame.  A similar Advent Calendar is in the artwork in CTMH's Holidays from the Heart Gift Guide, a limited time mini catalog featuring a new paper pack, Sparkle & Shine and new Christmas stamps sets as well as other new products.  I knew that I wanted to recreate one for myself and to show others.  I still want to upscale the embellishment on the title banner but for now it is done.  I plan on letting each customer at the crop select one of the little fry boxes, and awarding a prize based on the number as well as the Hershey Miniature candy bar that will be in each box. This project made quite a hit at our GottaStamp unit meeting with several people trying to claim it as their own.  It came back home with ME, though.

Supplies used:
Z1880 Designed Decor Black Frame
Z1815 Mini Clothes Pins
Z1790 Cricut Artiste Collection
X7176B Sparkle & Shine Paper Packet
D1552 Magical Days Stamp Set

Friday, October 11, 2013

As I promised a few days ago, here are the October projects for my Assisted Living group.  Well, sort of.  I did not use CTMH patterned paper for my ladies but I did recreate the cards in retired CTMH paper to share at my CTMH GottaStamp Crew unit meeting.  These are the CTMH versions.
This first one uses paper from the Wonderland kit.  The cute deer is from the retired Santa's List D1383, but the fancy swirl is available now - Swirls Around D1551.


This Autumn card uses our cardstock in Barn Red, Honey, and Goldrush, along with a bit of the retired paper packet, Dreaming, to really make that scalloped border show.  And of course, the scallop was done with our new scallop punch Z1851.


The highlight of the class was this adorable Witch's Hat mobile.  My ladies made it with a white ghost, but the ghost is from a non-CTMH Cricut cartridge so I changed it up to a black cat and changed the spider to purple to keep it all to CTMH cartridges.  I used Art Philosophy, Artiste and Artbooking - all three of our cartridges.  Every one of my ladies really liked how it turned out and I helped a couple of them pick a nice spot to display it near their doors.