This second card uses an old CTMH paper pack when the B&T paper was lighter weight with the reverse side being a monochromatic copy of the primary side. The center paper of this card looks like it is embossed but it is not. But that does give me an idea for my unit swap card! Anyway the stamps for the tag and cute little evergreen branches are from the Yuletide Carol WOTG G1084. This Workshop on the Go has great layouts for Christmas scrapping.
Tuesday, October 7, 2014
October's projects
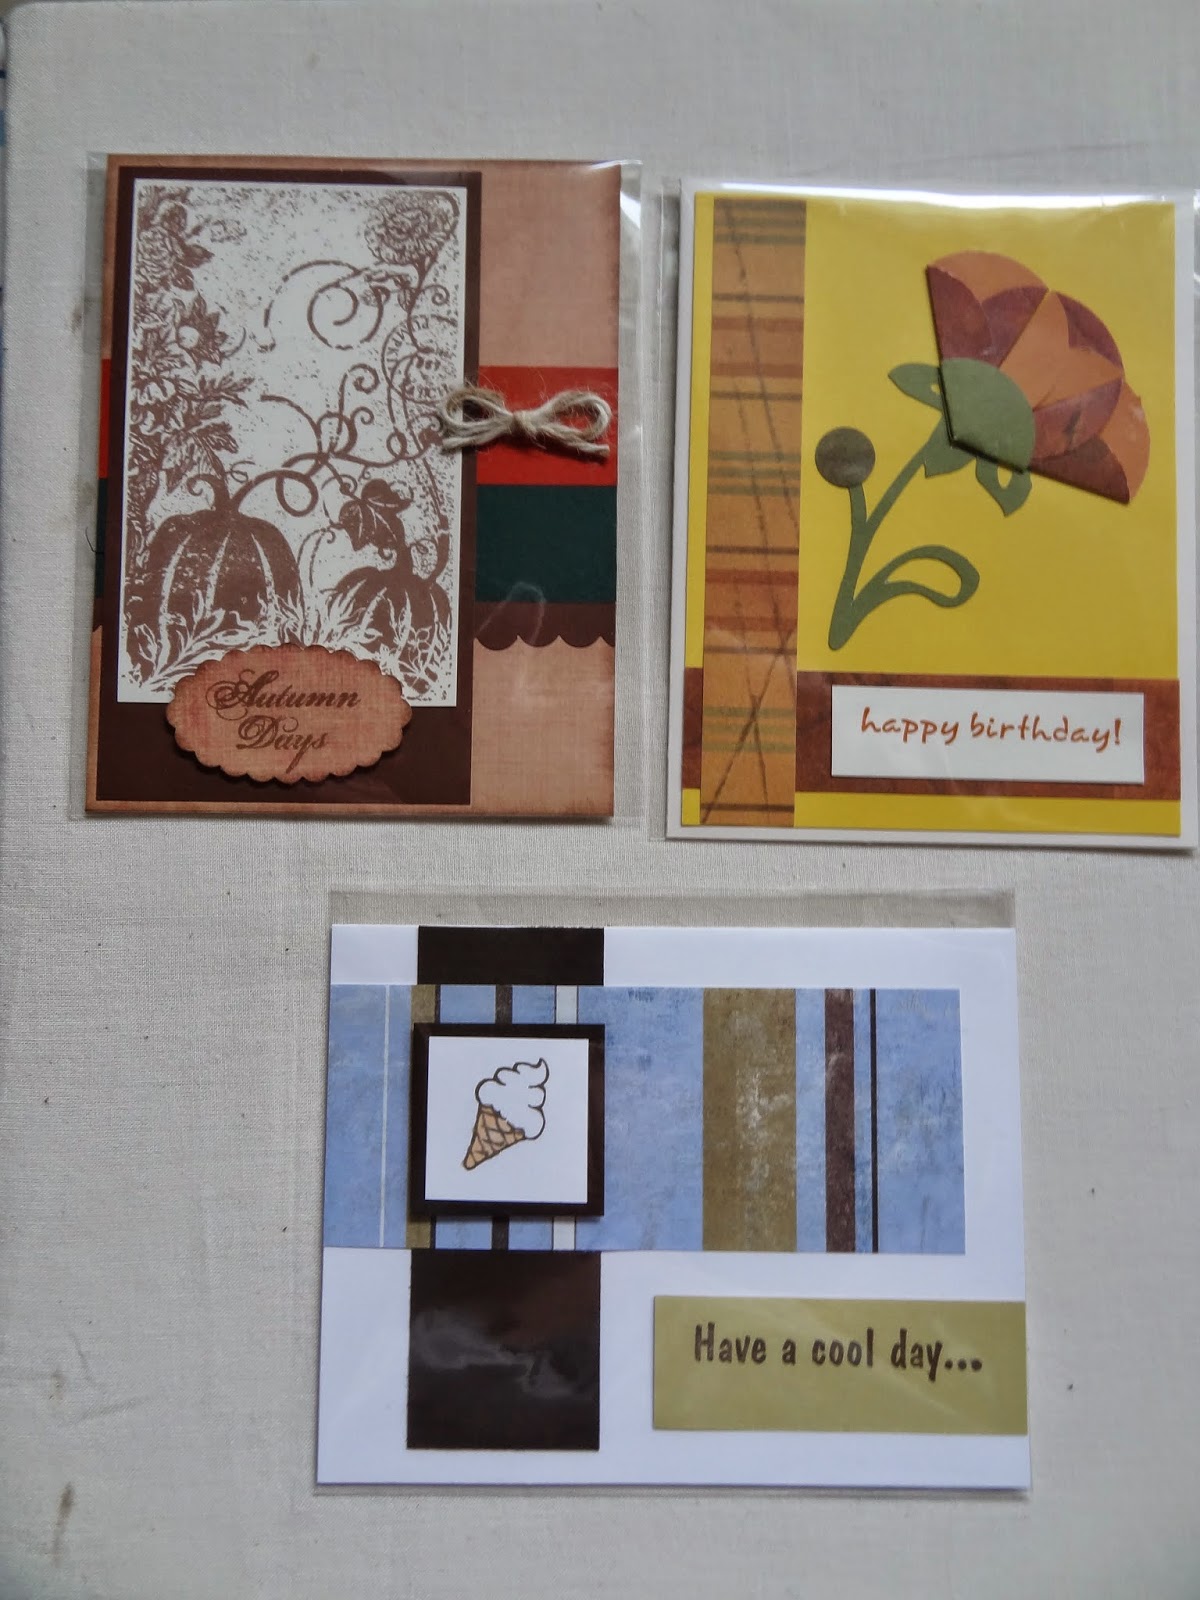
Here are two of the three projects I did with my ladies at the Assisted Living home. I will post the third project next month. The first is a birthday card. I colored the stamped image with a combination of Copic and CTMH's Shin Han alcohol markers. I love how you can deepen the colors by using multiple layers of the same color. And since these are alcohol markers the paper doesn't get wet and 'pill,' no matter how many times you color over the same spot. The stamp set is D1597 Hoppy Birthday. While it is not in the current Annual Inspirations catalog, it is still available.
Sunday, August 17, 2014
And on the paper crafting front...
I have been working hard on a card making class for my team's upcoming crop weekend which will include a project led by Close To My Heart's own Kristine Wittfield. I won't post the cards for my class until after the event in late September but I did want to share this month's cards from my class with my lovely lady friends at the assisted living facility. This month we added a few new faces and I think they had a good time.
I especially like the one with the little ice cream cone (from CTMH's new petite perks stamp set - ask me how you can get one.) It shows how even a single small stamp can be a big part of your project.
In September, we will get started on our Christmas cards. CTMH has so many great new Christmas stamps and paper that I can hardly wait!
Saturday, August 16, 2014
What I am stitching today
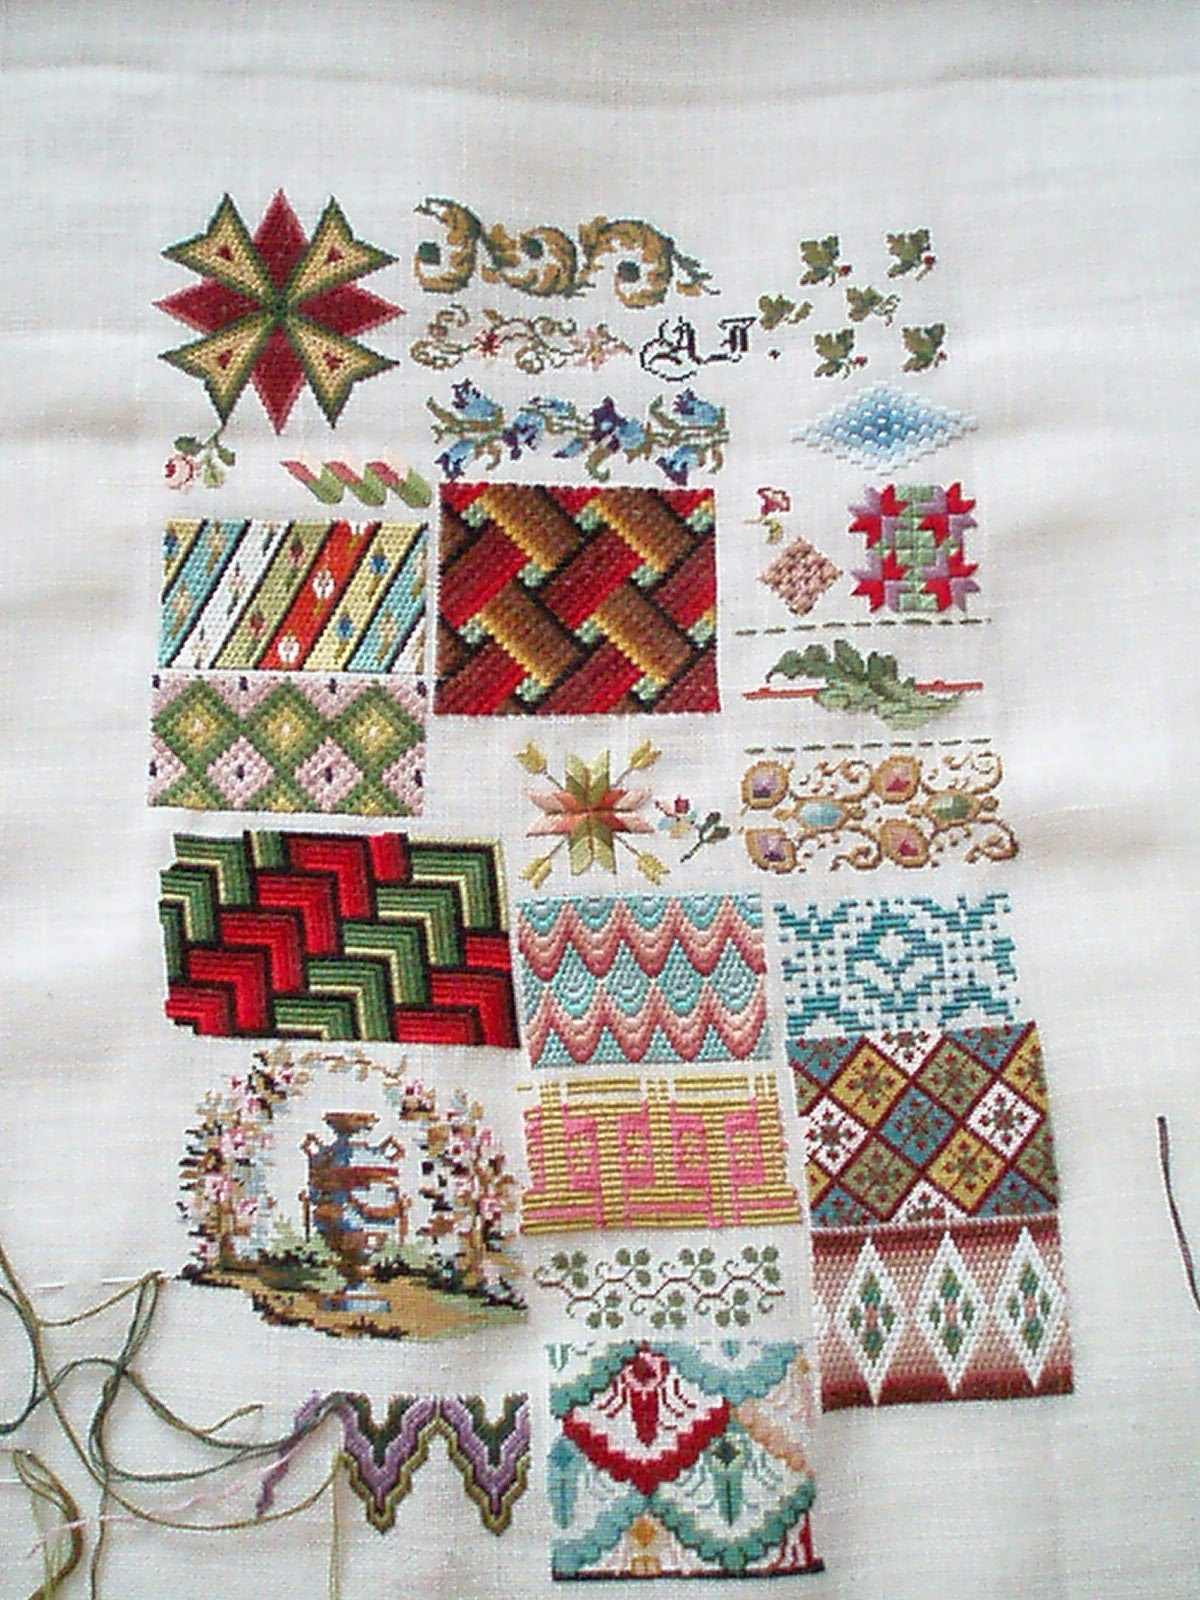
There is nothing like posting photos of all (well, most) of my UFO's to motivate me to stitch! I have worked on Rocky Mountain Christmas, the Mary Smithies repro sampler, and Winter Garden Gate, and my Angel of Healing. My Angel now has both wings and her face (which is stitched over one) doesn't look quite so scary. My current stitching project is the Berlin Wool Work Sampler.
Here are some photos showing my progress. I will post the BWWS progress when I move on to the next UFO since I plan on stitching one small floral and one LARGE floral motif before moving on.
Here are some photos showing my progress. I will post the BWWS progress when I move on to the next UFO since I plan on stitching one small floral and one LARGE floral motif before moving on.
Tuesday, July 29, 2014
More per your request.
Here is the Teddy Bear that I talked about in my other post.
This is my Marquior Sampler. It is a free pattern that was offered on-line in parts, except that I am changing motifs to fit MY life.
This is another festival class on making buttons. Once you have made the different buttons, you put them on the stitched piece. Obviously, I have two buttons left to make.
Colorado Roll and Pinkeep. All stitched, just needs to be finished. 2006
Patchwork Merklap. I purchased several designs by a Dutch gentleman, Jan Houtman, who has since passed away. This is all done over 1 and is not yet 1/4 done.
This is a Shepherd's Bush needleroll. Must be done or almost done stitching.
This is an over one from a kit purchased at one of the festivals. Maureen Appleton design, over 1.
Last of the Christmas ornaments from an early bird round robin class at one of the festivals in Des Moines. Early one, so probably SOXS (Spirit of Cross Stitch) in the mid nineties. It is done on silk gauze.
There are more but these are enough for now. Hope this satisfies you [2muchXS] gals!
Per request
I haven't posted much lately, and it has been a looooong time since I posted anything about my cross-stitch. I really have to make myself stitch, although I love it, because I try to spend my creative time playing with paper. But the activity on one of the cross stitch groups I belong to has picked up lately and they have requested that I post pictures of my work-in-progress stitching projects. And I think they will be sorry they asked. I took these pictures a couple of months ago, since then I have actually completed one project so got to delete the photo.
This is a reproduction sampler Hannah Prescott. I actually have a bit more done since the photo was taken.
This is a jeweled sampler garden from Liz Turner Diehl. I can't put my hands on it at the moment so I can't tell you the correct title.
This is the Berlin Woolwork sampler. It was published in 9 parts and I am completing part 3.
This is a mystery sampler that was obtained through the Sampler Guild of the Rockies. At the moment, it is dead in the water due to me having to make a color choice, I think.
This is MLI's Angel of Healing.
These are the supplies for a tray mat. I think I have the linen set aside, too. This was a SGR project.
This is A Victorian Fantasy by Vintage Designs. This was a class that I took at the 1999 Creative Arts and Textiles Show back when counted Cross stitch was just starting to decline in popularity. I have worked more on this.
I think this one is called Winter Garden Gate by Moss Creek Designs, Rae Iverson. I'm pretty sure this was another festival class. I also have the Summer Garden Gate kit but haven't started that and the date on that one is 1998.
This is the beginning of the huswife from Sampler and Antique Needlework, vol 2. Again, I can't put my fingers on the book, but it is somewhere in my stitching room. Hey, I had to move the ENTIRE room downstairs and then back upstairs in the last 10 years, so I am never quite sure where things are. But I know it is somewhere and if I want to work on this sometime, I will just have to look
.
This is Bands of Many Colors by Eileen Bennett. It is so close to finishing that it is a shame not to get it done.
This as the outside of what finishes up to be a needlebook. Designed by the same gal that did the turtle and teddy bear. It is done in a bargello-type pattern with lots of bugle beads.
Oh, yes. This is a Thomas Kinkaid. It still needs lots and lots of french knots. It was supposed to be a wedding present for one of my sibling's kids -- who now has teenagers.
This is as far as I have finished the Strawberry Basket band. I have the very nice woven oak basket that the whole liner fits into.
And here is Rocky Mountain Christmas that I am currently working on.
This is the Mary Smithies reproduction sampler from R&R Reproductions. This was a class from 2001 at Liberty Gathering in Liberty, Missouri. (That was a fun festival with all sorts of crafts - I took cross-stitch, quilting, even painting classes - taught by the husband of Chessie & Me cross-stitch designer.) It is a Mormon sampler stitched by Mary while traveling to Utah. I have quite a bit more done on this than shown. It always causes comments when I take it to Saturday Stitch when I go as there as every tenth linen thread has to be removed and replaced with a blue linen thread to simulate the learning linen that was used at that time.
This is Stitch Little Darling Sewing Basket by Merry Cox. I have about 1 1/2 sides of 4 done, then have the bottom inside of the basket to stitch before I can finish the thing, so still lots of work.
This is a reproduction sampler Hannah Prescott. I actually have a bit more done since the photo was taken.
This is a mystery sampler that was obtained through the Sampler Guild of the Rockies. At the moment, it is dead in the water due to me having to make a color choice, I think.
This is MLI's Angel of Healing.
These are the supplies for a tray mat. I think I have the linen set aside, too. This was a SGR project.
This is A Victorian Fantasy by Vintage Designs. This was a class that I took at the 1999 Creative Arts and Textiles Show back when counted Cross stitch was just starting to decline in popularity. I have worked more on this.
This fun project is a sampler turtle that finishes up into a 3D design. I can't put my fingers on any of the patterns to tell you who the designer is, but there is also a teddy bear. Two more classes that I took at cross-stitch festsivals.
I think this one is called Winter Garden Gate by Moss Creek Designs, Rae Iverson. I'm pretty sure this was another festival class. I also have the Summer Garden Gate kit but haven't started that and the date on that one is 1998.
This is the beginning of the huswife from Sampler and Antique Needlework, vol 2. Again, I can't put my fingers on the book, but it is somewhere in my stitching room. Hey, I had to move the ENTIRE room downstairs and then back upstairs in the last 10 years, so I am never quite sure where things are. But I know it is somewhere and if I want to work on this sometime, I will just have to look
.
This is Bands of Many Colors by Eileen Bennett. It is so close to finishing that it is a shame not to get it done.
This project was another class. More needlepoint than cross-stitch. When done, it finished up into a wooden spool which is really quite neat. I really intended to substitute a sampler for this, so probably will never finish this one.
This as the outside of what finishes up to be a needlebook. Designed by the same gal that did the turtle and teddy bear. It is done in a bargello-type pattern with lots of bugle beads.
Oh, yes. This is a Thomas Kinkaid. It still needs lots and lots of french knots. It was supposed to be a wedding present for one of my sibling's kids -- who now has teenagers.
This is as far as I have finished the Strawberry Basket band. I have the very nice woven oak basket that the whole liner fits into.
And here is Rocky Mountain Christmas that I am currently working on.
This is the Mary Smithies reproduction sampler from R&R Reproductions. This was a class from 2001 at Liberty Gathering in Liberty, Missouri. (That was a fun festival with all sorts of crafts - I took cross-stitch, quilting, even painting classes - taught by the husband of Chessie & Me cross-stitch designer.) It is a Mormon sampler stitched by Mary while traveling to Utah. I have quite a bit more done on this than shown. It always causes comments when I take it to Saturday Stitch when I go as there as every tenth linen thread has to be removed and replaced with a blue linen thread to simulate the learning linen that was used at that time.
This is Stitch Little Darling Sewing Basket by Merry Cox. I have about 1 1/2 sides of 4 done, then have the bottom inside of the basket to stitch before I can finish the thing, so still lots of work.
I think this is all I can put in one post but believe me, these are not all my UFO's!
Sunday, June 22, 2014
Making room for the new
Today I cut the straight pieces for FOUR double page layouts - the Skylark and Jubilee Workshops on the Go. I think that they will be lovely pages, I will just need to find the right pictures. I also cut the straight pieces (non-Cricut) for the Ivy Lane card Workshop. Two days ago I started and finished a double layout and last week I started and finished another double layout. Why am I so prolific? Because next week I get to see a brand spanking new ANNUAL catalog from Close to My Heart. NINE new paper kits, a new Cricut cartridge and LOTS more brand new stuff. I am so excited to be in the first group to see what is in store for the upcoming year!
Here are the two double layouts that are finished. The first will be going to the Mom of the baby boy I did some daycare for while she started back to work. I remember those days of leaving baby - surely no one could care for him the way I could. So I was happy to have George for a few hours a day while she eased back into the real world of full time work. After a month with me, she was ready to put him into a regular Daycare (or maybe she was afraid I wouldn't give him back! I used the paper kit "Babyckaes."
The second is of my grand-daughter Salem's trip to the zoo with her Daddy. I "see" her vicariously through my son's Facebook posting of her pictures. These pics were particularly nice ones and did well in the layout. The paper pack for this one was "Free to be Me", the May special.
Tuesday, May 13, 2014
Consultants - This is a free project. Feel free to share it with your customers and/or direct them here to my blog, but please do not charge them, other than printing charges for the tutorial. Thank you.
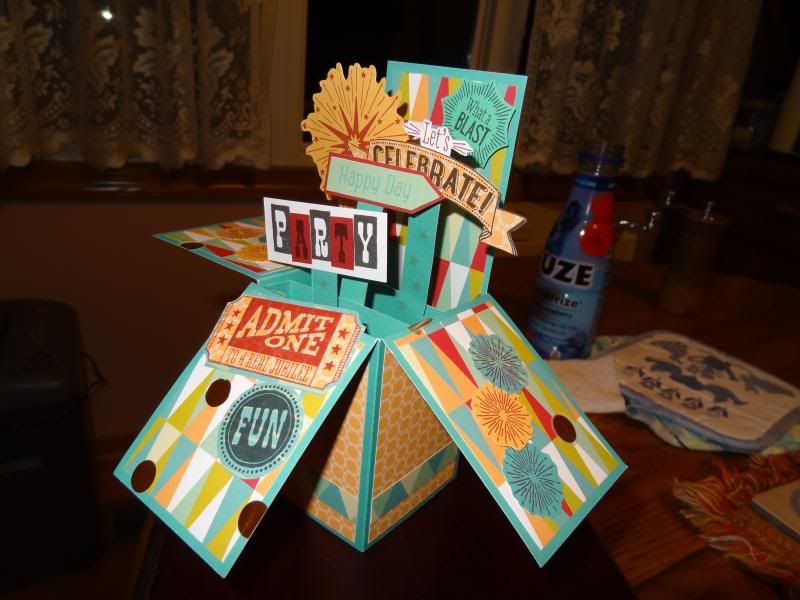
Free to be
Me Box Card Project
Created by
Janice Schmidt, CTMH Consultant
Paper - leftovers from the
"Free to be Me" paper pack.
Cut all the pieces to do Corporate's Workshop, including layouts and
cards, first. Save ALL the scraps, even the
little ones!!
From the triangle/orange dots
B&T you will need :
** CUT
FIRST** (a) ONE 6 3/4h X 2
1/4w inches with the triangles going up and down [Piece A] and
THREE 3h x 2.25w inches with triangles going up and down. The tall piece can be shorter but should be 4 inches minimum, the
taller, the better.
(b)
ONE 6 3/4 x 2 1/4 inches (this can be pieced if you can't cut it quite that
tall, 4 inches minimum,
then additional piece to make total 6 3/4 inches) [Piece B] and THREE 3 1/4 x 2 1/4 inches. The
orange circle side will be used for these pieces so orientation doesn't
matter.
(c)
any remaining scraps of this B&T
Scraps from the blue twiggy
B&T, Orientation doesn't matter, one
must be at least 2 1/2 x 1 1/4,
WHITE DAISY cardstock, 1 x 2 1/4,
and scrap 3 1/2 x 2
LAGOON cardstock, 10 1/2 x 7 3/4
inches, and 2 x 4 inches, and one or two scraps 1 1/2 inch square
RUBY cardstock, 5/8 x 2 1/4
inches and scrap 1 x 2 inches
CREME BRULEE cardstock 3 x 2 1/4
inches, and scrap 4 inch square
"Happy Day" from the
Zip Strip
FOUR 2 1/4 inch pieces from the Blue/green
triangle Zip Strip
Gold dot vellum, ALL scraps
Stamp sets - June SOTM S1406 Kaboom and Artiste Collection Birthday D1529
Black, Creme Brulee, and Ruby ink
pads
Trimmer
Embossing stylus (or whatever you use to score)
Bone Folder
Scissors
Foam tape
Adhesive for 3D item
1.Using Creme Brulee ink,
random stamp small star over LAGOON 2x4 piece. Cut into FOUR
1/2 x 4 inch strips.
2. Using RUBY ink, stamp
a) large
starburst and TWO small starbursts on 4
x 4 CREME BRULEE scrap, cut out
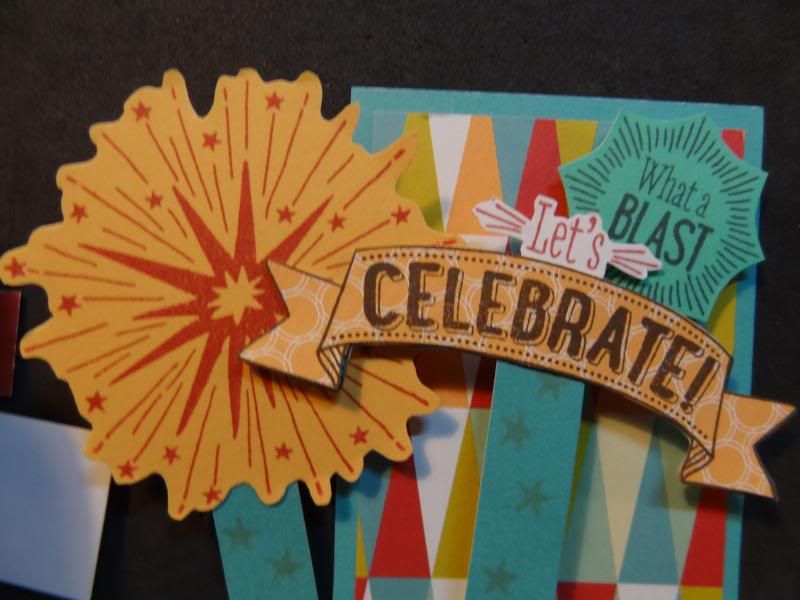
b) 'Let's Celebrate' banner on WHITE DAISY 3
1/2 x 2 scrap, cut out
c) 'Admit One' ticket on scrap orange circle B&T, cut out. Adhere to twiggy B&T and cut, leaving small
margin.
d) ONE
small starburst on scrap orange circle B&T
e)
'What a Blast' on scrap DREAM POP green cardstock, plain side. (Alternate, JUNIPER
cardstock or scrap twiggy B&T)
f)
'Birthday Wishes' banner on matching
WHITE DAISY Cricut Artiste shape (pg 76, 2 inches)
g)TWO small starburst on twiggy
B&T
3. Using BLACK ink, stamp
a)
'Let's Celebrate' banner on scrap orange circle B&T, cut out banner only
and adhere to WHITE DAISY
stamped piece.
b) '
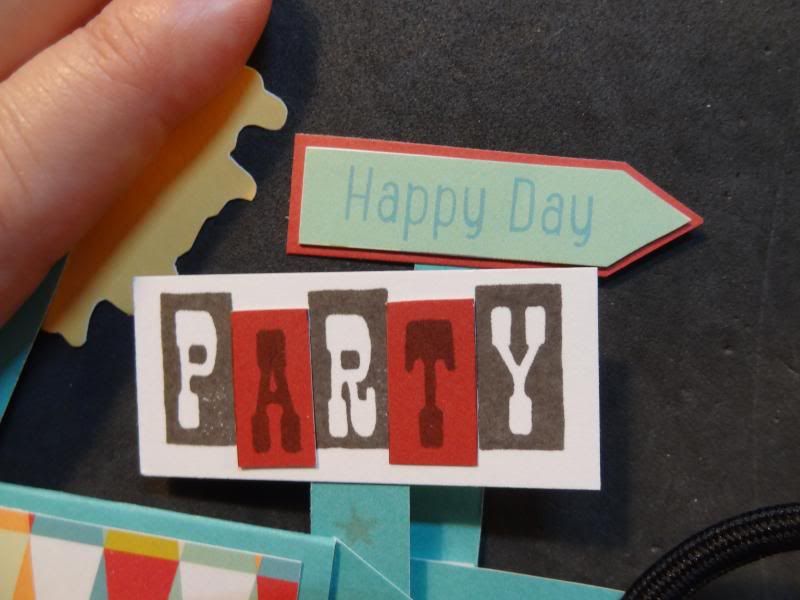
PARTY', once on WHITE DAISY 1 x 2 1/4,
and once on RUBY scrap, cut out the A and the T from RUBY cardstock and layer, slightly lower than
original 'A' and 'T' for a staggered look.
(See photo, 2nd below.)
c)
'FUN' on twiggy B&T scrap
.
5. Cut as many gold dots from vellum as desired, including
any partial dots.
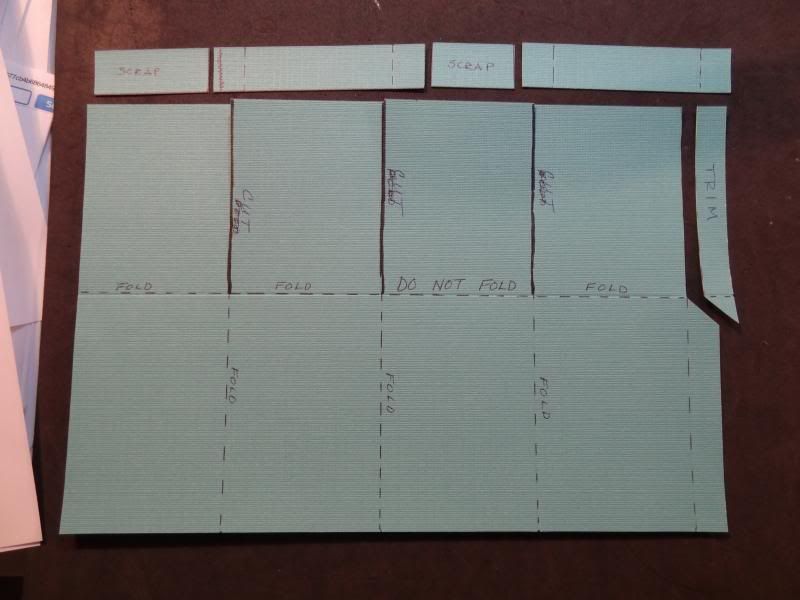
6. Score LAGOON cardstock at 2.5, 5, 7.5 and 10 inches. Turn and score at 3.75 inches. Trim 3/4 inch from the top of one long side,
leaving 3.75 below the score line (the bottom of the card) and 3.25 above the
score line (the top of the card). Cut
TWO pieces from this 3/4 inch strip which include a flat 2.5 inch section with
two 1/2 inch or so 'wings.'
7. Cut along score lines on the 3.25 section. Trim as shown above to create a tab for joining the
box together.
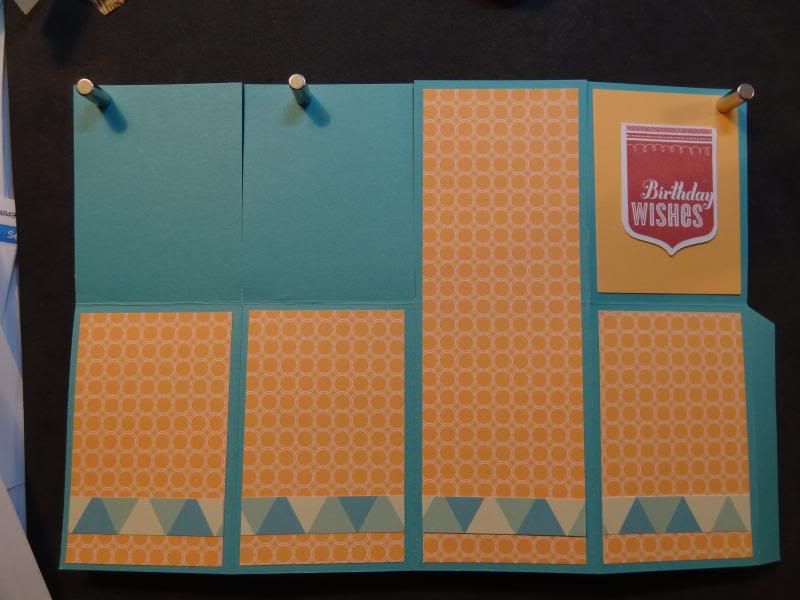
8. Adhere the
B&T, Creme Brulee, and zip strip
pieces as shown, covering any seams in
the longer B&T [Piece B].
Piece A goes on the inside on the
same section as piece b.
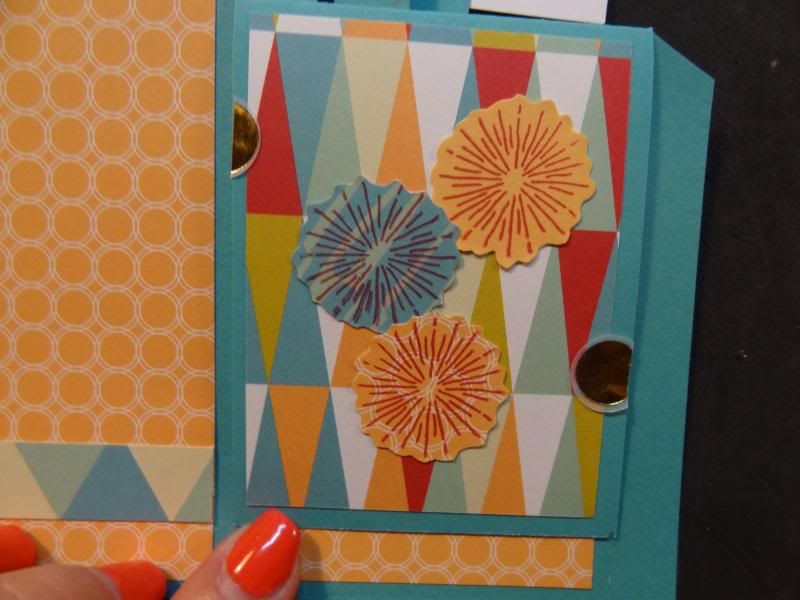
11. Adhere decorations to stamped strips and adhere as
desired to support strips, using foam tape to add additional dimension. Remember to keep decorations INSIDE THE
FOLDED CARD AREA! You can see Piece A in this last photo.
Subscribe to:
Comments (Atom)


